PATTERN HACK - Add Storm Cuffs to the Yates Coat
Sewing the Yates Coat
I recently made the Yates Coat by Grainline Studio. This coat had been on my to-sew list for some time. It's a simple shape and timeless style that is suited for almost every occasion. It would look fantastic colour blocked too. I had a week off work in October and with the weather fast turning wintery I used the opportunity to finally make my own.
I took my time with this one, not rushing and enjoying every aspect of the process from choosing fabrics and notions to adding finishing touches to the coat. I used a melange dark green Boiled Wool from my range of wools. Green has long been one of my favourite colours. To line the Yates I chose a gorgeous Cupro Rayon lining in blush. The dark green and the blush really compliment each other. I added a couple Kylie and the Machine labels for a professional finish.

Boiled wool is a dream to work with. It doesn't fray or curl and theoretically doesn't need any hemming either. You should use a Ballpoint needle. When working with thicker materials and layers its also useful if you have a walking foot for your sewing machine but it is not essential. A normal foot will do, but you may have to adjust the sewing foot pressure if this is an option on your machine. To achieve crisp flat seams, I recommend pressing briefly with a steam iron and then applying a wooden tailors clapper; but you could also use a roller.
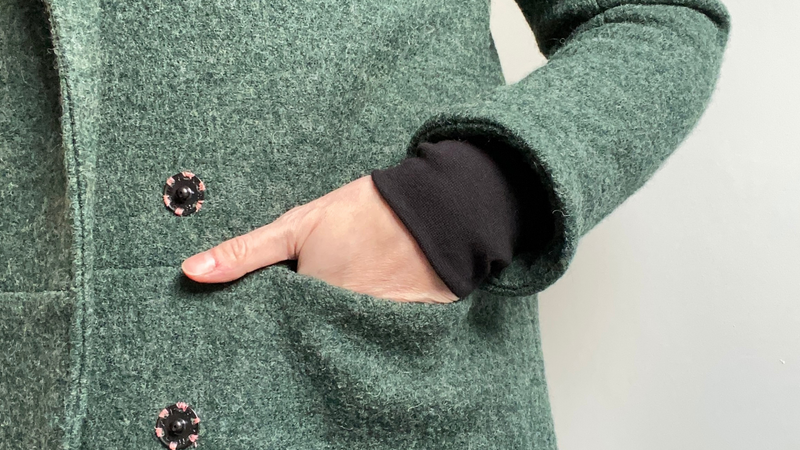
Adding Storm Cuffs to the Yates
My Yates has already had plenty of outings and it is as warm and cosy as I had hoped. I’m especially delighted with my storm cuff hack. No cold breezes getting up those sleeves!
I used regular stretch rib knit fabric which I closed into a loop to make a cuff, same as you would on a sweatshirt for example. The Yates coat pattern uses the bagging method to line the coat. It feels a bit like magic but is actually very straightforward. Adding storm cuffs may seem complicated at first but isn’t all that scary either.
When you’re ready to bring the sleeve and sleeve lining together (step 29 in the pattern instructions): Slide the cuff ribbing over the folded-up hem of the lining, pin or clip into place before sliding the sleeve over both cuff and lining (sandwiching the cuff between sleeve and lining) - making sure that the correct seams are matching up on all three layers. I recommend basting all three layers so that nothing moves, before sewing together. That’s it! When you pull the coat right side out, you’ll be rewarded with clean finished, nifty wind stopping cuffs on your Yates coat!

Hope you've enjoyed this little hack.
~~~
Questions? Comments? Drop us a line at hello@fabricromance.ie
If you have enjoyed this read then sign up for our Newsletter and follow us on Facebook, Instagram & Pinterest.

0 comments